Quickstart
Follow these steps to install the Tezos Unity SDK in an existing Unity project and start using it.
These instructions cover:
- Installing the SDK into an existing Unity project
- Testing that the SDK works in your project
- Connecting to a user's Tezos wallet
- Prompting the user to sign messages
Installing the SDK
In your Unity project, in the Package Manager panel, click the
+symbol and then click Add package from git URL.Enter the URL
https://github.com/trilitech/tezos-unity-sdk.gitand click Add.You can set a specific version of the SDK, such as version 4.0.0, by adding it to the end of the URL, as in this example:
https://github.com/trilitech/tezos-unity-sdk.git#4.0.0The Package Manager panel downloads and installs the SDK. You can see its assets in the Project panel under Packages > Tezos Unity SDK.
Ensure that you have a Tezos-compatible wallet configured for the Ghostnet test network on your mobile device. By default, the SDK uses Ghostnet instead of Tezos Mainnet. For instructions, see Installing and funding a wallet.
Connecting to wallets
Connecting to a user's wallet is a prerequisite to working with Tezos in any application. Accessing the wallet allows your project to see the tokens in it and to prompt the user to submit transactions, but it does not give your project direct control over the wallet. Users must still confirm all transactions in their wallet application.
Using a wallet application in this way saves you from having to implement payment processing and security in your application. Game developers can also use the wallet and its account as a unique account identifier and as the user's inventory.
The SDK supports three types of wallets:
- Tezos wallets that connect through the Beacon protocol, such as Temple
- Tezos social wallets that connect to a federated identity login through Kukai
- Ethereum wallets that connect through the WalletConnect protocol, such as MetaMask
The SDK can connect to these wallets in different ways depending on the platform. For example, in a WebGL application, it can show a QR code to allow the user to scan it with a wallet app on a mobile device. If the Unity application is running on a mobile app, it can open Tezos wallets on the mobile device directly, known as a deep link.
For more details, see Connecting accounts.
These instructions are for connecting to Tezos wallets through the Beacon protocol:
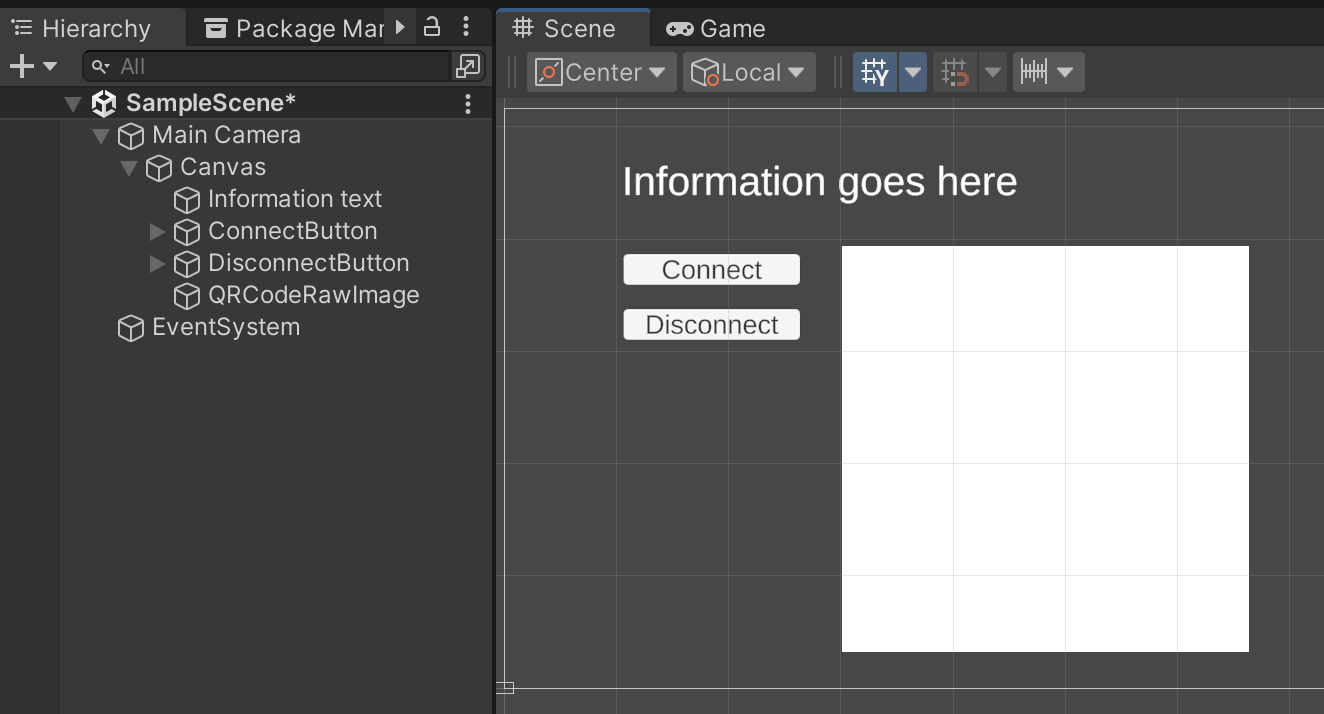
In the Unity project, add a button that users click to connect their wallet and a button that users click to disconnect their wallet. You will add code to these buttons in a later step. You can also use a single button and change its behavior to connect or disconnect based on whether there is a currently connected wallet.
Add a RawImage component to the project to hold the QR code and make it square and large enough that mobile devices can scan it.
Add a TextMeshPro text field to show information about the connection, such as the account address.
The scene looks similar to this example:
In your Unity project, add a class in a script file to hold the code for the connection operations. The class must inherit from the Unity
MonoBehaviourclass, as in this example:using System;
using Netezos.Encoding;
using Tezos.API;
using Tezos.Operation;
using Tezos.QR;
using Tezos.WalletProvider;
using TMPro;
using UnityEngine;
using UnityEngine.UI;
public class MyScripts : MonoBehaviour
{
[SerializeField] private QrCodeGenerator _qrCodeGenerator;
[SerializeField] private TMP_Text _infoText;
[SerializeField] private Button _connectButton;
[SerializeField] private Button _disconnectButton;
private async void Awake()
{
await TezosAPI.WaitUntilSDKInitialized();
// Check for prior connections
if (TezosAPI.IsConnected()) _infoText.text = TezosAPI.GetConnectionAddress();
// Run functions when users click buttons
_connectButton.onClick.AddListener(OnConnectClicked);
_disconnectButton.onClick.AddListener(OnDisconnectClicked);
// Generate QR code when user connects
TezosAPI.PairingRequested += OnPairingRequested;
}
private void OnPairingRequested(string data)
{
_qrCodeGenerator.SetQrCode(data);
}
private async void OnConnectClicked()
{
// Connect to a Beacon wallet (such as Temple)
var walletProviderData = new WalletProviderData { WalletType = WalletType.BEACON };
try
{
var result = await TezosAPI.ConnectWallet(walletProviderData);
_infoText.text = result.WalletAddress;
}
catch (WalletConnectionRejected e)
{
_infoText.text = "Wallet connection rejected";
Debug.LogError($"Wallet connection rejected. {e.Message}\n{e.StackTrace}");
}
catch (Exception e)
{
Debug.LogException(e);
}
}
private async void OnDisconnectClicked()
{
// Disconnect the currently connected wallet
try
{
var result = await TezosAPI.Disconnect();
_infoText.text = "Disconnected";
}
catch (Exception e)
{
Debug.LogException(e);
}
}
}This code includes:
  - Objects that represent the buttons, the QR code generator (from the class `Tezos.QR.QrCodeGenerator`), and a text field to show information on the screen
  - An `Awake()` (or `Start()`) method that waits for the `TezosAPI.WaitUntilSDKInitialized()` method to complete, which indicates that the SDK is ready
  - A check to see if a wallet is already connected, because Beacon can automatically remember previously connected wallets
  - Listeners to run when users click the buttons, in this case a connect button and a disconnect button
  - A method to generate the QR code to connect to a mobile application
In the Unity editor, create an object on the canvas to represent the script
QrCodeGenerator.cs, which is available in the Project panel atPackages/Tezos Unity SDK/Runtime/Scripts/QR/QrCodeGenerator.cs.Bind the RawImage component to the
Raw Imagefield of the script, as in this image: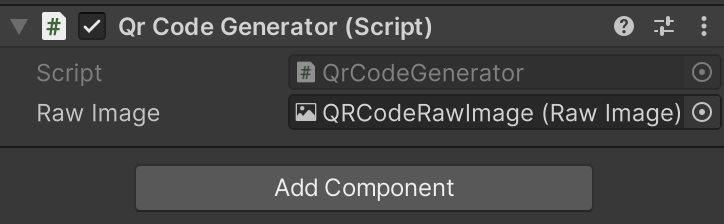
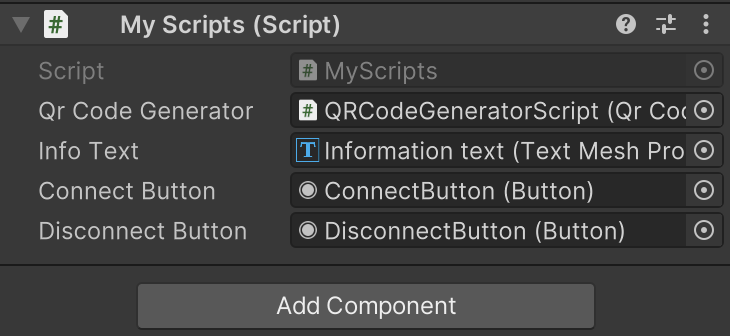
On the component that represents your script, drag the connection buttons, text information field, RawImage component, and QR code generator script to bind them to the objects in your script, as in this image:
Play the scene.
When the scene loads, click the connection button.
The Unity player may try to open a URL that starts with
tezos://. The SDK is trying to connect to a Tezos wallet on a mobile device. You can safely ignore and close this popup.The application shows a QR code.
In your Tezos wallet, scan the QR code and connect to the application.
If the connection is correct, the text field shows the address of the connected account.
Now the application is connected to the wallet and can submit transactions for it to approve and messages for it to sign.
Signing messages
You can use the connection to the user's wallet to prompt them to sign messages. Signing a message proves that it came from a specific user's wallet because the wallet encrypts the message with the user's account's key. In this way, game developers can make players sign a message as a way of validating their identity.
For example, this code prompts the user to sign the message "This message came from my account." Then it uses the Netezos library to verify that the payload was signed by the currently connected account:
string payload = "This message came from my account.";

var result = await TezosAPI.RequestSignPayload(
    new SignPayloadRequest
    {
        Payload = payload,
        SigningType = SignPayloadType.MICHELINE
    }
);

var publicKey = string.Empty;
if (TezosAPI.IsWalletConnected())
publicKey = TezosAPI.GetWalletConnectionData().PublicKey;
if (TezosAPI.IsSocialLoggedIn())
publicKey = TezosAPI.GetSocialLoginData().PublicKey;

var verified = NetezosExtensions.VerifySignature(
    publicKey,
    Beacon.Sdk.Beacon.Sign.SignPayloadType.micheline,
    payload,
    result.Signature
);
Debug.Log($"Signature verified: {verified}");
Calling smart contracts
Smart contracts are backend programs that run on the Tezos blockchains. Smart contracts can do many tasks, but for gaming they have two main purposes:
- They handle tokens, which are digital assets stored on the blockchain
- They provide backend logic that users can trust because it cannot change
To call a smart contract, the Unity application must be connected to a wallet. The application sends the smart contract transaction to the user's wallet for approval.
For example, this code sends a transaction to the entrypoint increment of the smart contract KT1R2LTg3mQoLvHtUjo2xSi7RMBUJ1sJkDiD, passes the parameter 5, and includes zero tez tokens.
When the transaction completes successfully, it logs the hash of the transaction.
You can use this hash to look up information about the transaction in a block explorer.
private async void Awake()
{
    await TezosAPI.WaitUntilSDKInitialized();

    _connectButton.onClick.AddListener(OnConnectClicked);
    _disconnectButton.onClick.AddListener(OnDisconnectClicked);
    _requestOperationButton.onClick.AddListener(OnRequestOperationClicked);

    TezosAPI.OperationResulted += OperationResulted;
}

private async void OnRequestOperationClicked()
{
    try
    {
        var request = new OperationRequest
        {
            // Contract to call
            Destination = "KT1R2LTg3mQoLvHtUjo2xSi7RMBUJ1sJkDiD",
            // Entrypoint to call
            EntryPoint = "increment",
            // Parameter to pass, as a Michelson expression
            Arg = new MichelineInt(5).ToJson(),
            // Amount of tez to send with the transaction
            Amount = "0",
        };
        var response = await TezosAPI.RequestOperation(request);
    }
    catch (Exception e) when (e is WalletOperationRejected or SocialOperationFailed)
    {
        Debug.LogError($"Operation failed: {e.Message}");
    }
    catch (Exception e)
    {
        Debug.LogError($"Unexpected error during operation: {e.Message}");
    }
}

private void OperationResulted(OperationResponse operationResponse)
{
    Debug.Log("Transaction hash: " + operationResponse.TransactionHash);
}
For more information, see Calling contracts.
Uploading files to IPFS
The InterPlanetary File System (IPFS) is a protocol and peer-to-peer network for storing and sharing data in a distributed file system. Blockchain developers use it to store data such as token images and metadata.
The SDK provides tools to upload to IPFS by using the Pinata API, but you can set up IPFS upload in other ways.
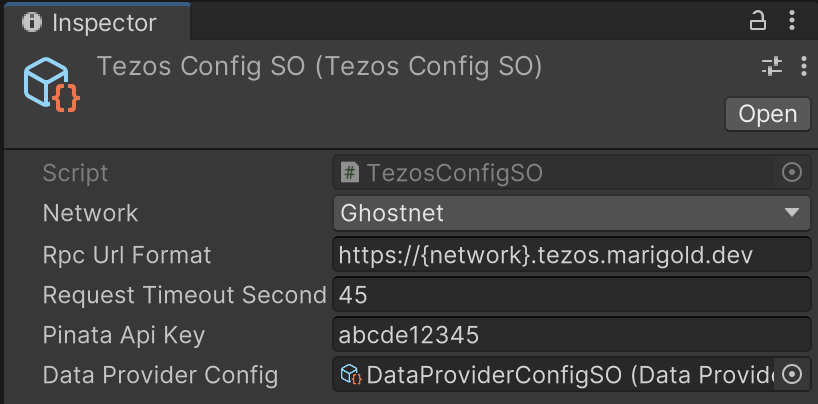
To upload files to IPFS, put your Pinata API JWT (not the API key) in the Pinata Api Token field of the Assets/Tezos/Resources/TezosConfig.asset object.
Then you can upload to IPFS with this code:
public void HandleUploadClick()
{
    var pinataToken = ConfigGetter.GetOrCreateConfig<TezosConfig>().PinataApiToken;
    if (string.IsNullOrEmpty(pinataToken))
    {
        Logger.LogError("Can not proceed without Pinata API key.");
        return;
    }

    var uploader = UploaderFactory.GetPinataUploader(pinataToken);

    var uploadCoroutine = uploader.UploadFile(ipfsUrl =>
    {
        Logger.LogDebug($"File uploaded, url is {ipfsUrl}");
    });

    StartCoroutine(uploadCoroutine);
}
When this code runs, the UI opens a file selection window and prompts the user to select a file.
Changing the RPC node
As described in The RPC interface, Tezos clients including the Unity SDK send transactions to RPC nodes. By default, the SDK sends requests to a public RPC node that uses the Ghostnet test network, where you can test transactions without spending real tez. For more information about test networks, see Testing on testnets.
If you need to change the RPC node that the SDK uses, such as if the default node is overloaded or if you are ready to send transactions to Mainnet, you can set the RPC node by editing the TezosConfig scriptable object at Assets/Tezos/Resources/TezosConfig.asset and setting the RPC URL in the Rpc Url Format field, as in this picture: